
Crepes sound exotic, sophisticated, elegant. In reality they are easy peasy. In the past week, I visited two different restaurants that featured scripelli in brodo, one of my favorite ways to use any leftover crepe batter and a satisfying first course. Crepes form the base for classic manicotti. Of course, crepes can be filled with sweetened whipped cream and topped with macerated fruit. My point? Crepes can appear as an appetizer, an entree or a dessert. They can also serve as breakfast, lunch or dinner. Talk about versatile!
Crepe batter is easy to make, and the ingredients are staples: eggs, salt, flour, milk, and butter. If you make the batter in the morning before you head out the door and stash it in the refrigerator, it will be rested and ready for your dining pleasure.
Recipe for basic crepes:
2 eggs
pinch salt
1 cup flour
generous cup of milk
1 Tablespoon melted butter (I melt the butter in my crepe pan and stash the pan in the oven until I'm ready to make the crepes so it is ready to go.)
Whisk the eggs with the salt until yolk and white are well blended. Add about half the flour and whisk until smooth, then whisk in half the milk. Repeat with the remaining flour and milk. When the batter is lump free, add the butter. Let the batter rest for at least one hour.
Heat a 10-inch non-stick pan over medium high heat until a drop of water dances on the surface. Add a quarter cup of batter to the center, and swirl until it covers the bottom of the pan. Watch for the batter to dry, then flip over (I use a butter knife and my immaculately clean fingers to swiftly do this). It should take less than two minutes for the first side to cook. Cook on the second side for another 30-45 seconds. Transfer the finished crepe to a dinner plate. Repeat.
Look for the next installment for ideas to use your crepes!
Monday, September 30, 2013


Saturday, August 17, 2013
August in the garden
We made our weekly visit to the Growers Market in West Chester this morning. The air was cooler than it was last week, but not quite cool enough for a sweater. The farmers are still selling tomatoes and peaches and corn, peppers and onions and eggplants, cucumbers and melons and plums. It's too early for fall crops, but I did notice some cabbage sneaking into the stalls.
Tonight for dinner, I'm looking forward pan-seared scallops with a salad of tomatoes, peppers, and cucumbers. We can dine alfresco, with a glass of crisp white wine. We can listen to the cicadas chirping and watch the fireflies. Maybe we'll see a few woodpeckers at the bird feeder next to the deck.
We are in the second half of August, so summer is coming to a close. We will certainly have more sweltering days here in the Philadelphia suburbs, but the nights will be cool enough to sleep with windows open under a blanket.
It's a melancholy time. Summer is about youth, but fall is middle-aged. It's easy to forget the calendar in the dog days. The shorter days remind me of my mortality.
But we still have a month of summer. To end tonight's meal, I'm going to make a peach gallette, easier than a pie but just as tasty. We should enjoy the time we have, after all.
Wednesday, June 19, 2013
Make a wish!
What does a mother do when her little girl who lives in St. Thomas visits for a week? If that mother happens to be part Italian, she cooks. This mother was disappointed that she only had a limited opportunity to coddle her little girl, but thrilled when she made a request.
It was her last night at home, and some of her friends were going to stop by. I had already made pizza and fried dough boys. I had already made manicotti. This time, she wanted pulled pork sandwiches.
Ordinarily, pulled pork requires at least two days, a full 24 hour session with a spicy rub to let it really seep into the muscle of the meat, then a long, slow cooking period, then an hour's rest before finally pulling the pork into shreds and simmering it in a light gravy. Instead, I had six hours to shop, cook, and prepare. I wasn't sure of the results of hurrying the process, but I had to give it a go. After all, she asked.
I found an 8-pound shoulder roast that had a generous coating of fat. I sprinkled it generously with garlic powder, hot paprika, fresh-ground pepper, and salt. I added a few shakes of cayenne pepper for oomph. I coaxed slivers of fresh garlic into slits all over the roast, and I browned all sides.
I crossed my fingers, set the oven to 350 degrees, and put the roast in a large Dutch oven. Before I put on the lid, I added three big sprigs of fresh rosemary and a dash of white wine. After an hour, I adjusted the oven temperature to 325 degrees. The aroma of garlic and rosemary filled the house. After another two hours, the fat on the top was golden brown and the meat was falling off the bone. After it sat for 15 minutes, the meat all but pulled itself into shreds. I strained the jus that was left in the Dutch oven, added another splash of white wine to deglaze the pan, then returned the jus and the pork and let it come to a slow simmer. It was tender and tasty.
Now I know I can make a family favorite in an afternoon.
Original Recipe
This is the rub recipe that I always use. My father asked the man who made pulled pork at his favorite grocery store for his secret recipe. After a little coaxing, the man shared it with my dad.
1 Tablespoon garlic salt
1 Tablespoon sugar
1 Tablespoon salt
1 Tablespoon fresh ground pepper
Cayenne pepper to taste
Pulled Pork
6-8 pound roast pork (preferably with the bone and from the shoulder--the loin is too lean for this dish)
1 recipe of the rub
1 head garlic
1 cup white wine (divided)
several sprigs fresh rosemary
canned beef broth (optional)
Rub the roast with the spice mixture. Sliver 4-5 cloves of garlic, and insert it into the meat with a sharp paring knife--cut into the roast with the knife, then use the knife as a lever to push the garlic into the roast. Place in a shallow bowl and refrigerate 12-24 hours.
About 8 hours before you want to serve the pork, remove it from the refrigerator. Heat a large skillet (do not add oil) over medium high heat for about 5 minutes, then put in the roast, fat side down. Allow to brown undisturbed for 5-8 minutes. To see if it is brown enough, see if the roast turns easily. If not, continue browning. Repeat on all sides.
Preheat oven to 275 degrees. Yes, that is an EXTREMELY slow oven, but it works best. Remove the browned roast to a Dutch oven large enough to hold it comfortably. Deglaze the pan you used to brown the meat with 1/2 cup white wine. Add the wine to the Dutch oven along with several sprigs of fresh rosemary and the remaining cloves of garlic (peel them first). Cover the pot and put into the oven. Don't open the oven door for the next 4 hours. Patience is a virtue!
During the 4 hours, the house will begin to smell wonderful and you can go about your business. After four hours, you can peak at the roast. If it looks golden brown and if there is a lot of juice, you can pull it from the oven, take the roast from the pan, and let it sit. If it isn't brown and falling apart, let it continue to cook for another hour. If the pan is dry, add more white wine.
After the meat is sufficiently cooked, let it rest for at least 15 minutes, then pull the meat into shreds, removing fat and bone. Strain the liquid left in the pan, and reserve. Deglaze with remaining white wine. Return the shredded pork and the reserved liquid to the Dutch oven. Allow to simmer until warm. It can simmer longer if you are waiting for late arrivals, and it can be made a day in advance. If it is too dry, add beef broth.
Serve in crusty rolls with horseradish. An 8-pound roast serves 12 people generously.
It was her last night at home, and some of her friends were going to stop by. I had already made pizza and fried dough boys. I had already made manicotti. This time, she wanted pulled pork sandwiches.
Ordinarily, pulled pork requires at least two days, a full 24 hour session with a spicy rub to let it really seep into the muscle of the meat, then a long, slow cooking period, then an hour's rest before finally pulling the pork into shreds and simmering it in a light gravy. Instead, I had six hours to shop, cook, and prepare. I wasn't sure of the results of hurrying the process, but I had to give it a go. After all, she asked.
I found an 8-pound shoulder roast that had a generous coating of fat. I sprinkled it generously with garlic powder, hot paprika, fresh-ground pepper, and salt. I added a few shakes of cayenne pepper for oomph. I coaxed slivers of fresh garlic into slits all over the roast, and I browned all sides.
I crossed my fingers, set the oven to 350 degrees, and put the roast in a large Dutch oven. Before I put on the lid, I added three big sprigs of fresh rosemary and a dash of white wine. After an hour, I adjusted the oven temperature to 325 degrees. The aroma of garlic and rosemary filled the house. After another two hours, the fat on the top was golden brown and the meat was falling off the bone. After it sat for 15 minutes, the meat all but pulled itself into shreds. I strained the jus that was left in the Dutch oven, added another splash of white wine to deglaze the pan, then returned the jus and the pork and let it come to a slow simmer. It was tender and tasty.
Now I know I can make a family favorite in an afternoon.
Original Recipe
This is the rub recipe that I always use. My father asked the man who made pulled pork at his favorite grocery store for his secret recipe. After a little coaxing, the man shared it with my dad.
1 Tablespoon garlic salt
1 Tablespoon sugar
1 Tablespoon salt
1 Tablespoon fresh ground pepper
Cayenne pepper to taste
Pulled Pork
6-8 pound roast pork (preferably with the bone and from the shoulder--the loin is too lean for this dish)
1 recipe of the rub
1 head garlic
1 cup white wine (divided)
several sprigs fresh rosemary
canned beef broth (optional)
Rub the roast with the spice mixture. Sliver 4-5 cloves of garlic, and insert it into the meat with a sharp paring knife--cut into the roast with the knife, then use the knife as a lever to push the garlic into the roast. Place in a shallow bowl and refrigerate 12-24 hours.
About 8 hours before you want to serve the pork, remove it from the refrigerator. Heat a large skillet (do not add oil) over medium high heat for about 5 minutes, then put in the roast, fat side down. Allow to brown undisturbed for 5-8 minutes. To see if it is brown enough, see if the roast turns easily. If not, continue browning. Repeat on all sides.
Preheat oven to 275 degrees. Yes, that is an EXTREMELY slow oven, but it works best. Remove the browned roast to a Dutch oven large enough to hold it comfortably. Deglaze the pan you used to brown the meat with 1/2 cup white wine. Add the wine to the Dutch oven along with several sprigs of fresh rosemary and the remaining cloves of garlic (peel them first). Cover the pot and put into the oven. Don't open the oven door for the next 4 hours. Patience is a virtue!
During the 4 hours, the house will begin to smell wonderful and you can go about your business. After four hours, you can peak at the roast. If it looks golden brown and if there is a lot of juice, you can pull it from the oven, take the roast from the pan, and let it sit. If it isn't brown and falling apart, let it continue to cook for another hour. If the pan is dry, add more white wine.
After the meat is sufficiently cooked, let it rest for at least 15 minutes, then pull the meat into shreds, removing fat and bone. Strain the liquid left in the pan, and reserve. Deglaze with remaining white wine. Return the shredded pork and the reserved liquid to the Dutch oven. Allow to simmer until warm. It can simmer longer if you are waiting for late arrivals, and it can be made a day in advance. If it is too dry, add beef broth.
Serve in crusty rolls with horseradish. An 8-pound roast serves 12 people generously.
Saturday, June 8, 2013
Tea Time

The clink of ice in a tall glass of tea is one of the
most welcome sounds of summer. It brings back memories of sitting on the glider
on the front porch and watching the cars go by on Lincoln Highway, memories of
listening to my parents’ friends chatting around the kitchen table, memories of
playing endless games of Monopoly with my brothers in the cool basement.
My mother did not make instant tea or buy tea already made
and sweetened. She boiled a big pot of water, steeped bags of tea while it was
still hot, added a generous mountain of sugar, and then put it in the
refrigerator to cool. We had no icemaker then, so she poured water into
aluminum ice-cube trays. Does anyone remember carefully transporting the trays
into the freezer to avoid spilling water? Back then it made a huge difference
because the freezer had to be defrosted when ice built up. When the cubes were
hard, Mom pulled the lever to release them—and what a horrid sound that made,
like fingernails on a chalkboard. She tipped the cubes into an ice bucket and
deposited two in a glass before pouring the chilled tea over them.
Iced tea was more special then, perhaps because it took more
time to make and more effort to give it a frosty chill. Maybe that’s why the
memories of iced tea from my childhood are so vivid and special.
Now that summer is here, there is always a pitcher of iced
tea in my refrigerator. This month’s BonAppétit has a recipe for making tea without boiling water and another for a
peach syrup to flavor it. You really should check it out.
Here’s my version of this summer staple:
2 cups water
5 bags of black tea
generous handful of mint leaves
¼ cup sugar
Ice
Additional water
Put two cups of water, tea, and mint leaves into a 4-cup
glass measuring container. Microwave on high for 4 minutes. Remove from
microwave and let sit for 5 minutes to brew. Put sugar into a half-gallon Tupperware
pitcher (or other heatproof container). Strain the steeped tea into the pitcher
and stir to dissolve the sugar. Add about 3 cups of ice cubes to the container
and continue to stir. Fill container with water. Serve.
Thursday, May 16, 2013
April showers bring May flowers—and vegetables!
Last week brought the return of my favorite farmers and
artisans to the local farm market. Beautiful spring weather brought out
familiar faces that I’ve missed over the winter, even if I don’t have names to go
with the faces. At the East Goshen Farmers Market, I was spoiled for choice,
both for spring crops and for Mother’s Day presents. Asparagus, kale, leeks,
green onions, new potatoes, arugula, lettuces provided inspiration for several
banquets. Chocolates and cakes and cookies and waffles and bread satisfied everyone's hunger for sweets and starches. Dog lovers could indulge their favorite pooch
with treats or immortalize a pampered pet with a custom portrait. There was
even a stand with hand-sewn aprons, potholders and bags.
 |
| Grandmom Ancone |
While I look forward to going to the market, my great grandmother
depended on her own resources to supply her family with produce. The
season’s bounty was that much fresher because it came straight from the garden.
Grandmom would gather her harvest in her apron and tote it into the kitchen
where she would perform her alchemy. The first sign of spring in our house were
the fresh greens. She would forage for the first tender dandelions and for
broccoli rabe, and her garden produced tiny, tender leaves of spring lettuce
long before they became a gourmet specialty. Baby onions were turned into an omelet
within hours of being plucked from her garden. The eggs came from her own hens.
We nibbled on fresh peas as we shelled them, but she would save enough to add
them at the last minute to her veal stew.
My mother continues the tradition of her grandmother-in-law,
and she plants a kitchen garden, but much of her harvest goes to the deer that
live on her property. She enjoys gardening, though, and doesn’t begrudge the animals
their share.
I only dabble. I have a collection of fresh herbs growing in
pots on the deck and one lonely tomato plant surrounded by garden lettuce that
I look forward to harvesting soon and dressing lightly with my
great-grandmother’s vinaigrette. She would drizzle olive oil over the leaves,
toss, add a splash of vinegar made from homemade wine and a generous pinch of
salt, toss again, and taste and adjust until it tasted right.
My only change is
that I put the dressing ingredients in the bottom of a bowl that I’ve rubbed
with the cut end of a clove of garlic. Oh, and I add a dollop of Dijon mustard,
which helps emulsify the vinegar and olive oil. You can get fancy and mash in an anchovy or two, or you can add a handful of fresh herbs, or you can substitute balsamic vinegar or lemon juice for the red wine vinegar. Use a fruity olive oil, or experiment with the various nut oils, but don't substitute vegetable oil. Olive oils are heart healthy, and a tablespoon will dress enough lettuce for two to four people. The loss of flavor isn't worth any caloric savings!
If you feel a need to measure, the ratio of vinegar to olive oil is 1:2 (1 tablespoon vinegar to 2 tablespoons of olive oil, for example). Three tablespoons of dressing is enough to dress a huge salad--you don't want to drown those tender lettuce leaves!
Monday, April 29, 2013
Fairy tales, myths, and chicken stock
 |
| Rumpelstiltskin |
Whoever first conceived the notion of a bouillon cube must
have been a true charlatan, a charlatan who deprived generations of home cooks
of the delight of transforming simple ingredients into liquid gold. In their original conception, bouillon cubes were called portable soups and made from
dehydrated vegetables and fat. Now they are made commercially and contain 1200
mg of sodium in a single cube.
Here it is, a rainy spring day, damp and chill, yet my
kitchen is warm and cozy because I’m making chicken stock. I’ve always loved
the story of stone soup, and this morning life imitated art. When I opened the
refrigerator, the meaty carcass of last week’s chicken almost fell into my
hands. I pulled out my stockpot, tossed in the carcass, and covered it with water.
While I waited for the water to come to a boil, I found
carrot and celery sticks from last night’s crudité platter, the au jus
from the original roast that I hadn’t bothered to turn into gravy, and three
lonely cloves of garlic. Each of these items alone could have been discarded
easily, but they all were welcomed into the pot.
At this point, I could have left well enough alone. The soup
would be fine as is, but I do like to gild the lily. A yellow onion studded
with cloves (from Penzy’s, of course), a few whole black peppercorns (also from Penzy’s), a sprinkle of sea salt all joined the bubbling jumble in the pot. In the
crisper, I saw the green leaves that topped the organic celery, the part that
many home cooks toss without thinking, but today they, too, were added to the
soup.
In an hour or two, I’ll strain the liquid and refrigerate
it. Tonight we’ll have chicken rice soup, and there will be golden stock left
over to use later in the week, in recipes that call for a bouillon cube.
Maybe this is more the story of Rumpelstiltskin, of spinning
worthless straw into gold. But the funny little man in that tale didn’t tell
how he made the transformation. Instead he used his secret to blackmail the
queen. There is no secret to making a pot of soup, not even a real recipe. Use
what you find in your refrigerator and you’ll find that you, too, can turn
leftovers into something even better than gold—because you can’t eat gold. Ask
Midas. But that’s another story.
Monday, March 25, 2013
Easter Bread and Frittata
 |
| Credit: Double Nickel Farm |
For many, Easter is synonymous with candy, marshmallow peeps, chocolate bunnies, coconut eggs, jelly beans, even pastel candy corn. When I was growing up, I looked forward to shopping for a spring coat, dress, and patent leather shoes. My brothers and I anxiously anticipated an end to this season of fasting and penance. We were starving for all the foods we gave up for Lent. One of my fondest Easter memories involves not candy but bread.
After a long Lenten season, my great-grandmother would celebrate the coming of Easter with a special bread. She started with a rich, brioche-like dough, shaped it into a braided ring, and tucked colored hard-boiled eggs into the spaces in the braid. For her great-granddaughters, she would make pocketbooks from the bread with a colored egg peeking out from the top. For her great- grandsons, she made long-eared bunnies holding an egg in its paws. Did anyone think to write down her recipe? Sadly, no.
The eggs in the bread made the children aware of this important symbol for Easter, which for my great-grandmother was truly a holy day. Eggs represent new life, and for Catholics, Easter is about the Resurrection, so eggs represent Christ's emergence from the tomb.
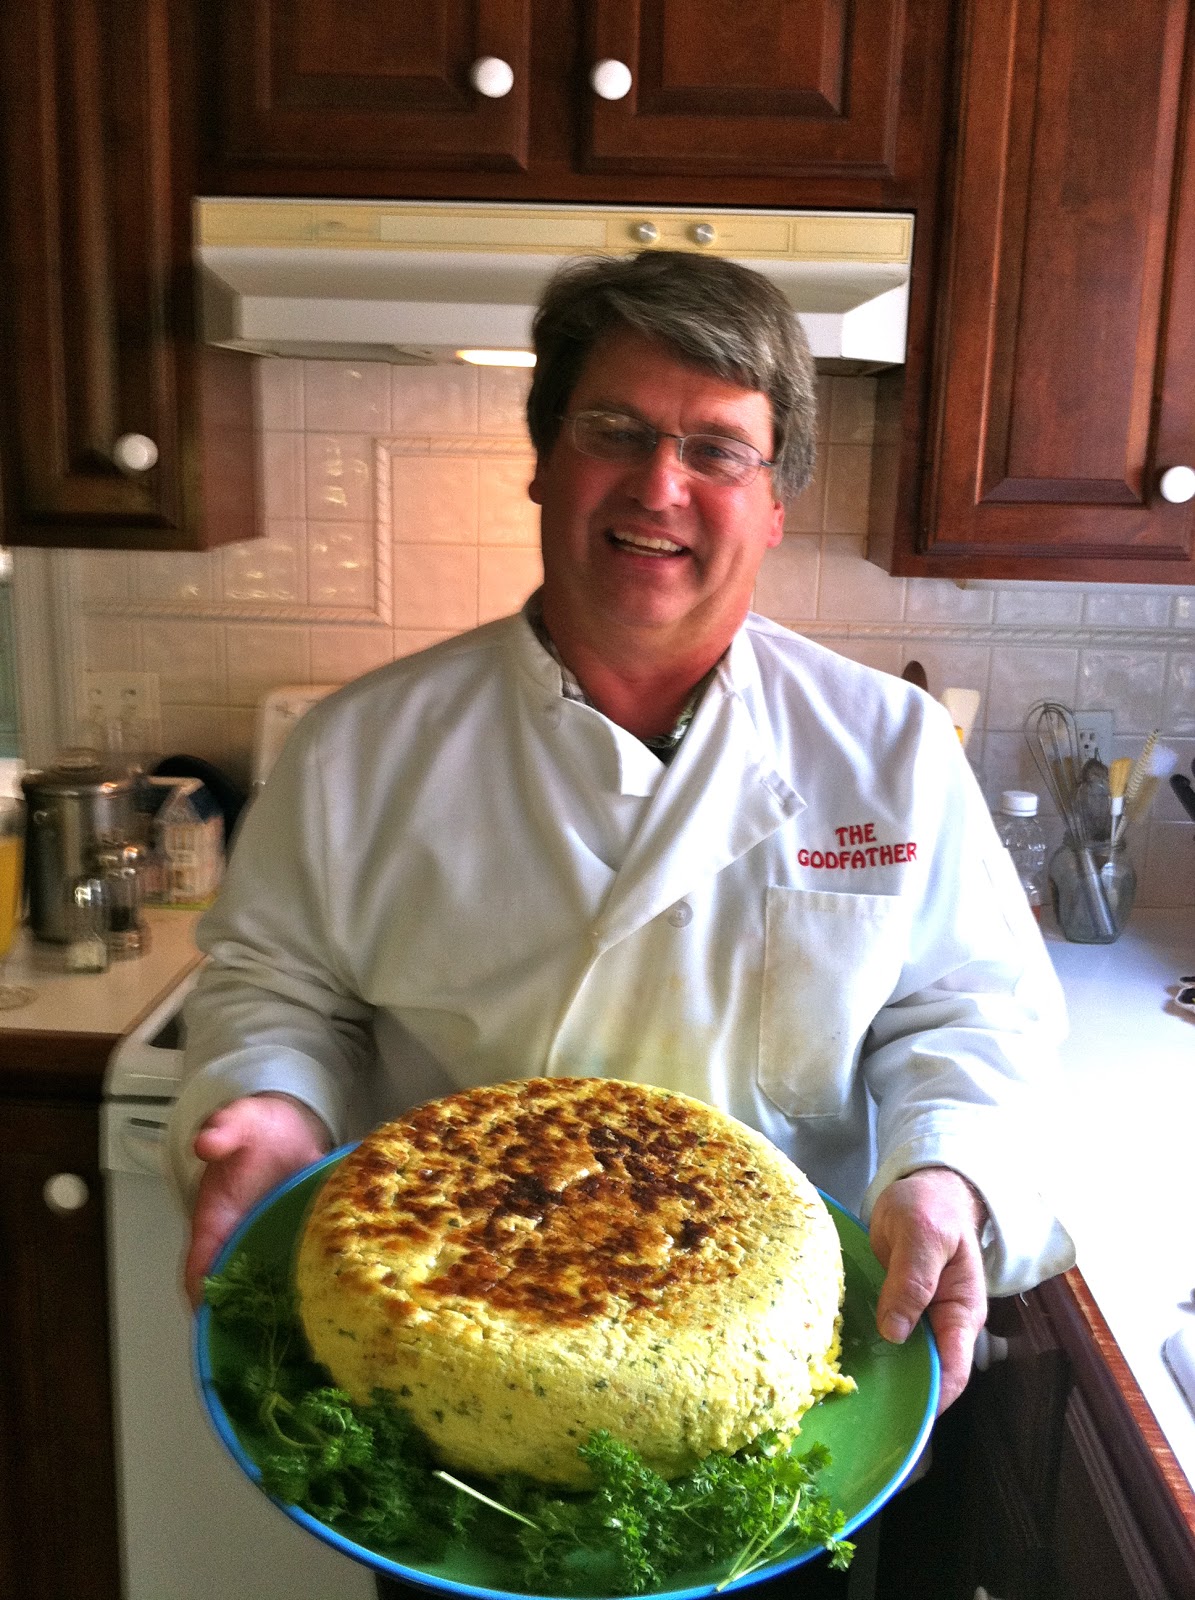 |
| My brother Michael with our Easter frittata, a 50 egg omelet. |
This frittata is not fast food. Michael starts over an hour before we sit down. He carefully cracks fifty eggs into a huge bowl. He finely chops a whole bunch of Italian parsley. He grates orange rind. He adds a three-pound container of ricotta to the eggs and carefully breaks up the yolks and incorporates the cheese. He heats oil in the skillet until is sizzles when he drops a teaspoon of the egg mixture into the pan. And then it's time to pour the egg mixture into the oil, to carefully lift cooked egg to allow raw to seep underneath. Eventually, it's time to flip the frittata over, no feat for the timid, but Michael has never been accused of being a scaredy cat. And then it's time to serve this masterpiece to the oohs and aahs of everyone at the table. We'll say grace and be thankful for our family, and then savor the best frittata ever.
May you and your family have a happy and holy Easter Sunday.
Here is a scaled-down recipe for our family's frittata recipe:
Frittata
8 eggs
1 cup ricotta cheese
1 Tablespoon grated orange rind
1/4 cup chopped Italian (flat-leaf) parsley
pinch salt
generous grind of fresh pepper
2 Tablespoons canola oil
sprigs of parsley and thin slices of orange for garnish
Mix the eggs with a fork until the yolks are broken, then add the next 5 ingredients. Mix until well incorporated. Heat about half the canola oil in a medium skillet* until it sizzles when a drop of egg is added. Add the egg mixture. As the egg cooks, gently lift the cooked egg and allow the raw egg to run underneath. When the eggs are set but the top is still moist, remove the skillet from the heat, place a plate that is slightly larger than the skillet on top, and flip the frittata onto the plate. Remove any egg that is stuck to the bottom of the pan, wipe the pan clean, reheat with remaining oil. (Work quickly!) Slip the frittata back into the skillet, wet side down, and cook until the bottom is golden brown. Transfer the frittata to a clean plate, garnish with the parsley sprigs and orange slices. Serves two or three generously.
*Use a medium or even a small skillet so that the frittata is thicker than a standard omelet.
Subscribe to:
Posts (Atom)

 Posts
Posts

